Tuesday, 22 May 2012

Skirt With Yolk

The skirt with a yolk is defiantly the most challenging skirt I've had to manufacture yet. The reason it was so challenging was because i had to add
  • Yoke
  • Box pleat
  • Kick pleat
  • Concealed zip
It come with great difficulty to manufacture this skirt not only is there more pattern pieces but more maths to go along with it !!! Maths certainly isn't my strongest point. Here is how I manufactured the skirt with a yoke:
  • I drew around my skirt blocks adding a box pleat.
  • I added flare by extending my hem and drawing a line from my new hem to the hip line.
  • I traced the yoke and closed the darts then re-traced the new yoke and added a 1.5cm seam allowance.
  • To create my front skirt piece I traced of my first draft and measured the box pleat 4cm and timed it by 3.
  • I taped it to the edge of my pattern piece and folded equally and created notches. I added a 1.5cm seam allowance and cut it out.
  • To create the kick pleat I got the back piece of my skirt and traced the first draft to create the kick pleat I drew a 20cm line and marked of CB adding a 5cm along the bottom.
  • I then added a 1.5cm seam allowance and cut it out.
  • I then placed all my pattern pieces onto my material and cut them all out and manufactured the skirt.
Pictures to be uploaded soon

Thursday, 17 May 2012

Dress With panels

I traced around a dress block,  then drew in my design lines from the top and bottom of the dress darts on the front and back pieces. After I drew my design lines I drew 2 panels on each pattern piece.


I then traced both panels, marked all lines and notches and added a 1.5cm seam allowance. The left  front dress pattern pieces, the center front pattern piece will be cut on fold..


Next was to create the facing patterns to do this I taped the patterns together at the shoulder as they would be if I were sewing them together, I then drew a line with about 5cm distance from the seam line around the arm and the neck of my patterns. After that I drew around the facings I just drew and added a 1.5cm seam.        

 I sewed my front pieces together, I sewed my side panels of my front dress pieces together first and then I sewed the center front panel matching all of my notches. To sew the  curved areas I had to make notches as the fabric was very tight otherwise the pieces wouldn't have fitted together.

I then sewed the sides of my dress together instead of doing it after everything else just to make life easier for myself.

I then sewed the neck facing on to do this I first overlocked the  edges, then pinned the facing on to the neck and sewed so the edge was over lapped by 1.5cm. Then I cut the seam in half, sewed a retainer stitch on the facing and ironed the facing on.

The arm facings  overclocked, and then sewed the edges together with a 1.5cm seam allowance, and then sewed a retainer stitch for both arm facings.  I then pinned to the fabric making sure the back piece of the facing matched the back of the arm and the front and the same again with the neck facing.

I am very pleased with my final outcome I didn't really know what to expect with the dress but I was surprised with myself as it went well. I would pick a different dress design next time as this one isn't really me and I wasn't fond of the material but as it was my first time making a dress I am really pleased with myself.
This is an image of my final dress
There are more photos to come but due to having problems with my camera I am unable to upload anymore pictures.


Thursday, 3 May 2012

Banksy Umbrella Girl ReCreation

Task 4 was the final shoot in which I had to recreate another artist's work. We had to take inspiration from our contextual studies book and pick an artist who we had already researched into and liked their work. I chose Banksy and his image 'Umbrella girl'. I chose 'Umbrella girl' as I thought it would be really good and challenging to recreate and I was right because the image wasn't of an actual real life person and it was a painting of a young girl. This meant that I couldn’t create some of the features with a real life model. Also I couldn’t find a young girl to model for me so I had to use my friend Jessica. I overcame the problems I was faced with and did the rest of the preparation and planning and when it came to the day of the shoot I was ready. I enjoyed doing this shoot it was my favourite one of them all mainly because I love Banksy's work. I had problems with trying to get my image printed in A3 as the photographer who helped me with my shoot was unable to email me the file on time. I think the target audience for this would be male and females aged 18+ years on the high street. I was very pleased with my final recreation image and it turned out better than I would have imagined it to.
Here is my final recreation of Umbrella Girl- Banksy.
This is the original Banksy- Umbrella Girl
Task 3: I was given a word/theme which I then had to create a story with using props, hair, makeup and a studio that I set up for myself. I had to experiment and plan before creating the shoot, using a variety of techniques to create different messages. The first word I was given was EXPLOSION. I had to research into what explosion meant and what I thought and explosion was. Then with that research I planned out how I wanted my shoot to go such as the hair, makeup, backdrop, model, clothes, colours, etc.. I then went ahead and created a shoot. I also had to research the psychology of colour so I understood what the colours actually conveyed. I really enjoyed this task as I hadn't done a photo shoot before and it was exciting. I liked the freedom and creativity that came with it. I didn’t do as much planning as I should have done which had its downfalls when it came to doing the shoot. Creating the ideas for the shoot and being able to do what I wanted was really exciting, although I feel I could have gone out of my comfort zone more.
We were told to watch a short film called Le Balloon Rouge (Red Balloon). The film didn't have much dialogue and there wasn't very much colour apart from the red balloon. The film is about a little boy who finds a red balloon only to discover the balloon has a life of it's own and follows him around everywhere. Other little boys try to steal the red balloon from the little boy who had found it. At the end of the film the red balloon shrivels up as though its about to die. After the red balloon dies a whole bunch of balloons appear out of nowhere and take the little boy off into the sunset. After the short film we were told to create a story of our own taking inspiration from Le Balloon Rouge which was challenging. I enjoyed creating this story and I used my friend Pippa as the model and I made her look like she was from the 1950's standing in a park. Next to her is a red balloon floating around as though it has a mind of its own just like the one in the film.

Comparing Two Stylist Work

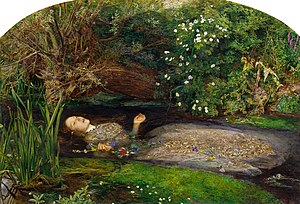
I had to find two stories from different stylists and compare their work producing a 250 word written piece. I had to explain how the stories were different such as the lighting that was used and then the model's poses. I had to consider what they conveyed and the messages behind each story. This was also very difficult for me but with the list of questions from the previous task I managed to understand what I was talking about. I compared Grace Coddington's 'A Winters Pale' and Katie Grand's 'What Lies Beneath'. Both of these stories are inspiring to look at with the use of lighting and colour used in different ways to set the moods of each show and it makes them both dramatic. My favourite one of the two fashion stories has to be Katie Grand's 'What Lies Beneath'. The feeling it gives you just from looking at it is incredible, it reminds me of an enchanted forest. Katie took a lot of inspiration for this shoot from a Shakespere play called Hamlet and a character called Ophelia. The image of Ophelia is now a famous image of her floating down the river. The below painting depicts this and is from the Pre-Raphaelite Brotherhood and was painted by John Everett Millais.
Grace Coddington and Katie Grand work in very different ways. I personally think that Katie Grand is more daring that Grace Coddington with the way she conveys her work. 'What Lies Beneath' is a great example of that as she chooses to have naked models in and around a lake and takes her inspiration from famous plays like Hamlet and the Pre-Raphaelite's work. Grace Coddington, on the other hand, is daring but plays it safer but she creates some beautiful work and meaningful stories.

Fashion Stylist

I was given a number of tasks to complete. My first task was to research into a number of stylists and their work and analyse the messages and stories behind each story. I was also asked to work out who was their target market. The stylists I looked into were called:
·         Grace Coddington
·         Katie Grand
·         Katie Shillingford
·         Robbie Spencer
·         Camille Bidault Waddington
This task came with great difficulty as I found it hard to look at other people's work and find out what the meaning is behind it and the write about it. I overcame this problem with a list of questions to ask myself. The questions I asked were:
  • What does the lighting convey?
  • What do the colours convey?
  • What props are used?
  • What do the  model's poses convey?
  • What do the model's facial expressions convey?
  • What is the target audience?
  • What does the model's age convey?
 I was really inspired by some the stories I researched into. I thought Grace Coddington as a stylist is very inspirational. Before we started task 1 we watched a documentary called the September issue, which showed us the life of a stylist and the process they go through before they create their shoots. Grace Coddington was the stylist in the film and I think her style of work is incredible. I have learnt how much hard work goes into being a stylist as before I didn’t really understand the job role. From learning about what a fashion stylist does and watching the September issue it has changed my opinion on what job role i would like to do in the fashion industry, as I am now considering going into styling myself.